Using External Wi-Fi Adapters on Apple Silicon Macs with OrbStack
A Kali Linux VM running in OrbStack lets an Apple silicon Mac use USB Wi-Fi adapters such as the Netgear A8000 for scanning with WiFi Explorer Pro 3 and packet capture with Airtool 2, including simultaneous multi-channel captures with several adapters.
macOS has never made it practical to use a typical USB Wi-Fi adapter for scanning or monitor-mode capture. The adapters that are interesting for Wi-Fi work, the ones with good Linux driver support, monitor mode, and, increasingly, 6 GHz radios, either have no macOS driver at all or ship a proprietary one that exposes none of that. Plugging one into a Mac does not give WiFi Explorer Pro 3 or Airtool 2 a second Wi-Fi interface to pick from. WiFi Explorer Pro 3 and Airtool 2 have no native support for external Wi-Fi adapters, and without access to the drivers there is no realistic way for us to add it from the application side.
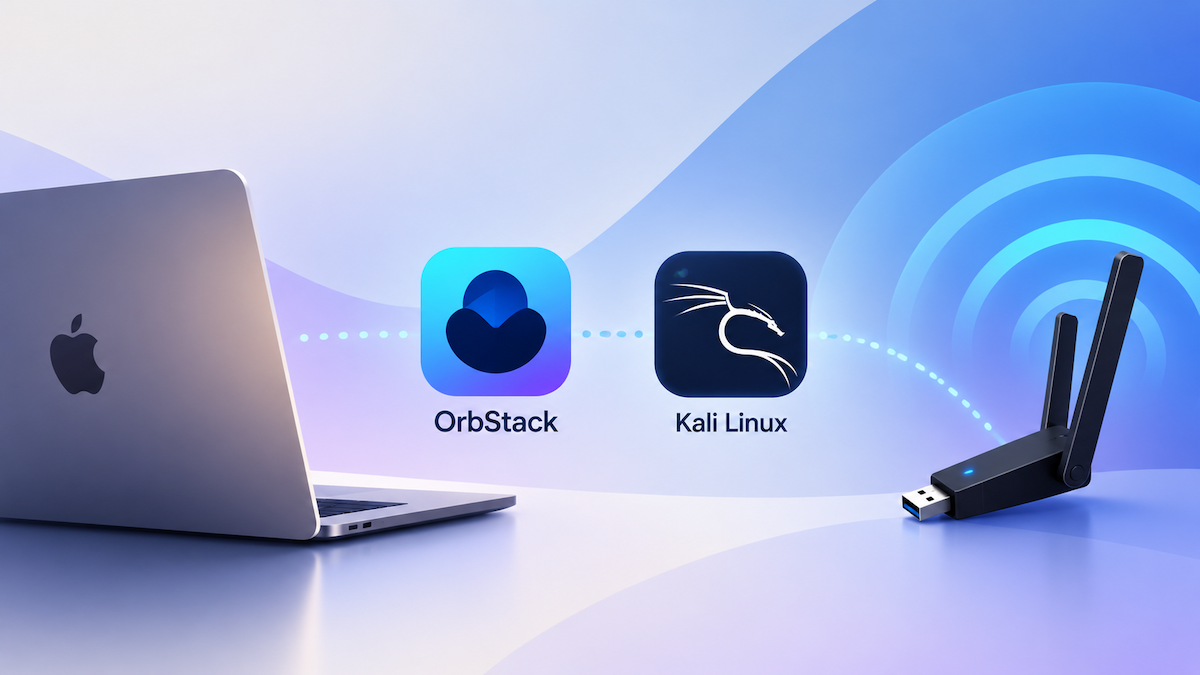
The workaround is to put Linux between the adapter and the Mac. This article walks through running a Kali Linux virtual machine in OrbStack on an Apple silicon Mac, passing a USB Wi-Fi adapter through to it, and using that VM as a remote sensor for WiFi Explorer Pro 3 and as a remote capture source for Airtool 2. The adapter we tested with is the Netgear A8000 (AXE3000), a Wi-Fi 6E adapter that works out of the box in this setup. It also covers the regulatory domain configuration that 6 GHz depends on, and how to plug in several adapters at once for simultaneous multi-channel captures.
A little history: external adapters and EASE
Back in 2018 we introduced the External Adapter Support Environment, or EASE. It was a small, purpose-built Debian virtual machine, created and provisioned automatically with Vagrant and VirtualBox, that came with the wireless drivers for a list of common USB adapters already installed. EASE used the remote sensor functionality in WiFi Explorer Pro and Airtool 2: once you attached an adapter to the VM through VirtualBox’s USB device filters, it showed up in WiFi Explorer Pro as a “pseudo-local” sensor, and Airtool 2 listed EASE as a sensor for capturing, including multi-source captures with several adapters.
Using it required no Linux knowledge. The problem was that everything underneath it was Intel-specific: VirtualBox’s USB passthrough, the Vagrant boxes, and the custom VM image all assumed an x86 Mac. When Apple silicon arrived, that stack stopped being viable, and nothing on the new platform fit EASE’s approach. Apple’s Virtualization framework, which the lightweight Linux VM tools for Apple silicon are built on, provides no general USB passthrough, so none of those tools could hand a Wi-Fi adapter to Linux. The full desktop hypervisors that could pass USB devices through to an Arm Linux VM are heavyweight, mostly commercial, and not something we could script into a small, self-provisioning appliance the way Vagrant and VirtualBox allowed. Rebuilding EASE on that foundation was not something we could justify. In June 2025 we marked EASE as deprecated in its GitHub repository and removed the EASE integration from both apps, in WiFi Explorer Pro 3 version 3.7.3 and Airtool 2 version 2.6.1. EASE does not work on Apple silicon Macs, and current versions of the apps no longer look for it.
The underlying idea, however, was never tied to VirtualBox. It was simply: let Linux drive the adapter, and let WiFi Explorer Pro and Airtool talk to Linux the same way they talk to any remote sensor.
Why OrbStack makes this possible again
OrbStack is a lightweight container and Linux VM platform for macOS, built natively for Apple silicon. It has run full Linux machines for a few years now, with a variety of distributions and tight macOS integration (shared files, machine-name.orb.local hostnames, an orb command that drops you into a shell). What changed recently is USB. OrbStack 2.2, released in June 2026, added USB device passthrough to those machines, implemented by OrbStack itself rather than by Apple’s framework. OrbStack’s documentation explicitly lists USB Wi-Fi adapters among the devices it can pass through, and Wi-Fi adapters that support monitor mode as a use case.
OrbStack supplies three things this setup needs:
- A Linux environment on Apple silicon that takes a minute to create.
- USB passthrough for the Wi-Fi adapter, so a Linux driver controls the hardware.
- A network path from macOS to the VM, so WiFi Explorer Pro 3 and Airtool 2 can reach it as a sensor.
OrbStack itself does not scan for Wi-Fi networks or capture packets. Its job is to provide the virtual Linux machine and hand the USB adapter to it. Linux and its Wi-Fi driver control the adapter, and WiFi Explorer Pro 3 and Airtool 2 talk to Linux over SSH using their existing remote sensor functionality. The chain is the same for both: the adapter is passed through to the Kali VM, Linux and its driver control the radio, and the app connects to the VM over SSH, WiFi Explorer Pro 3 to receive scan results and Airtool 2 to receive captured frames. Neither app ever touches the USB device directly.
This is not EASE brought back to life. There is no automatic provisioning, no pseudo-local sensor entry, and you do need to type a handful of Linux commands. But the result is functionally the same, and the setup takes well under an hour.
Why Kali Linux?
OrbStack supports sixteen distributions, and WiFi Explorer Pro 3 and Airtool 2 do not care which one you use. Any Linux system with SSH access, the required utilities, and a Wi-Fi adapter the kernel can drive can be a sensor.
We chose Kali because it is what many people in the wireless and security fields already use. If you have done any Wi-Fi troubleshooting or assessment work on Linux, you have probably used Kali, know its package set, and are comfortable with the wireless tooling it ships with. That familiarity is worth more than any technical difference between distributions for this use case, because the sensor side of this setup is a handful of standard utilities that any Debian-based system can install.
Kali does not, however, decide which Wi-Fi drivers are available. OrbStack runs all of its Linux machines on a single shared kernel that OrbStack itself provides and keeps current (Linux 7.0 at the time of writing). Wi-Fi drivers live in the kernel, so the in-kernel mt7921u driver that handles the A8000 comes from OrbStack’s kernel, not from Kali. The Netgear USB IDs for the A8000 have been in the mainline driver since 2023, which is why the adapter was recognized as soon as it was attached in our testing, with no driver compilation or out-of-tree module involved. Any of OrbStack’s distributions would see the same driver. Kali supplies everything above the kernel: the userspace tools, the packaging, and an environment that wireless people already know.
Do not read this as “every USB Wi-Fi adapter works in OrbStack.” Whether a given adapter works depends on its chipset, Linux kernel and driver support, firmware, whether the driver supports monitor mode and channel switching, which bands the hardware supports, and whether OrbStack’s USB passthrough handles the device. The A8000 is what we tested. Other adapters may work, but treat them as untested until you have verified them yourself.
What you’ll need
- An Apple silicon Mac running a current version of macOS.
- OrbStack 2.2 or later. USB passthrough was introduced in 2.2.0.
- A Netgear A8000 (AXE3000) USB Wi-Fi adapter. This is the tested adapter, and the rest of the article uses it as the reference.
- WiFi Explorer Pro 3 and/or Airtool 2.
- Optionally, a USB hub and additional adapters for multi-channel captures. More on that later.
You should be comfortable with Terminal on macOS. No Linux administration experience is assumed; every command is spelled out.
Create the Kali VM
Install OrbStack by downloading it from orbstack.dev and opening it, or with Homebrew:
OrbStack installs the orb command-line tool. You can create Linux machines from the app or from Terminal; this article uses Terminal because the steps are easier to reproduce. Create a Kali machine named kali:
The first argument is the distribution, the second is the machine name. The name matters because it becomes the hostname you will point WiFi Explorer Pro 3 and Airtool 2 at (kali.orb.local). Creation takes under a minute on a fast connection. OrbStack creates a user inside the VM with the same name as your macOS user.
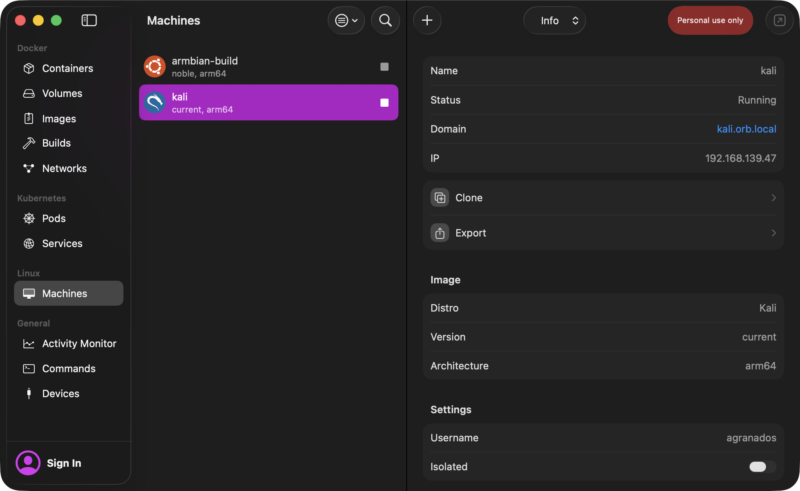
The machine name becomes the hostname the apps connect to.
Verify: list your machines and confirm the Kali machine is running.
Then open a shell in it:
You should land at a Kali prompt. Everything in the next two sections runs inside this shell unless noted otherwise.
Prepare Kali
Three things need doing inside the VM before it can act as a sensor: give the user a password, give the machine its own SSH server, and install the utilities the apps run. All of it happens in the Kali shell you just opened.
Set a password for the VM user
WiFi Explorer Pro 3 and Airtool 2 authenticate to a Linux sensor over SSH with a username and password. OrbStack creates the VM user with no password at all, so password authentication cannot succeed until you set one. Inside the Kali shell:
Enter and confirm a password. You will type this password into WiFi Explorer Pro 3 and Airtool 2 later, and both apps can store it in your Mac’s keychain.
A note on sudo: the general sensor setup in Connect to a sensor involves creating a file under /etc/sudoers.d/ so the SSH user can run iw, ip, tcpdump, and scandump with sudo without a password prompt. OrbStack already configures passwordless sudo for the VM user in /etc/sudoers.d/orbstack, and setting a login password does not change that. Skip those sudoers steps entirely. Do not edit /etc/sudoers or add your own sudoers file.
Verify: confirm the password is set and that sudo still works without prompting.
The first command prints a status line for your user; a P in the second field means a usable password is set. The second command prints the OK message only if sudo ran without asking for a password.
Enable SSH access to the VM
OrbStack has a built-in SSH server (ssh orb), but it accepts key authentication only and is meant for tools like VS Code and Ansible. WiFi Explorer Pro 3 and Airtool 2 need username and password authentication, so the Kali VM needs its own SSH server listening on port 22. Install and enable it:
The OrbStack Kali image does not include openssh-server, since OrbStack expects you to use its own SSH server, so this install step is required rather than optional.
Verify from Kali:
It should print active. Then, from a macOS Terminal window, confirm you can reach the VM by hostname and log in with the password you set:
Accept the host key, enter the password, and you should get a Kali prompt. Type exit to return to macOS. This is exactly the path WiFi Explorer Pro 3 and Airtool 2 will use, so if this works, the connection part of the sensor setup is done.
Install the required utilities
A Linux sensor needs ip (from iproute2), iw, tcpdump, and scandump. ip is part of every Kali installation, and iw and tcpdump come from Kali’s package repository. Install usbutils at the same time: it provides lsusb, which the next section uses to confirm the adapter arrived in the VM, and the OrbStack Kali image does not include it. Back in the Kali shell:
scandump is our own small utility. It performs an active scan using the 802.11 netlink API and writes the results as a PCAP file with radiotap headers and beacon frames, which is what WiFi Explorer Pro 3 consumes in active scan mode. It is built from source following the instructions in its repository:
The Kali side is now fully prepared. Leave this shell open; we will come back to it to verify the adapter.
Connect the USB Wi-Fi adapter
Plug the Netgear A8000 into your Mac, directly or through a hub. OrbStack shows connected USB devices in the Devices tab of the OrbStack app, grouped as Forwarded, Passthrough, and Not shared. Selecting a device shows its type, vendor and product IDs, speed, and serial number, and the Attach button passes it through to Linux. Detach returns it to macOS.
The same can be done from Terminal, which the rest of this section uses. From macOS:
Verify: the A8000 appears in the list. The first column is the device ID you will use in the next command. Optionally look at the details:
Now attach it. For USB network adapters, OrbStack lets you choose which machine the resulting network interface joins with the -m flag, so we attach it to the Kali machine explicitly:
A Wi-Fi adapter uses what OrbStack calls dedicated passthrough: while attached, it belongs to Linux and is not visible to macOS until you detach it. macOS could not use it anyway.
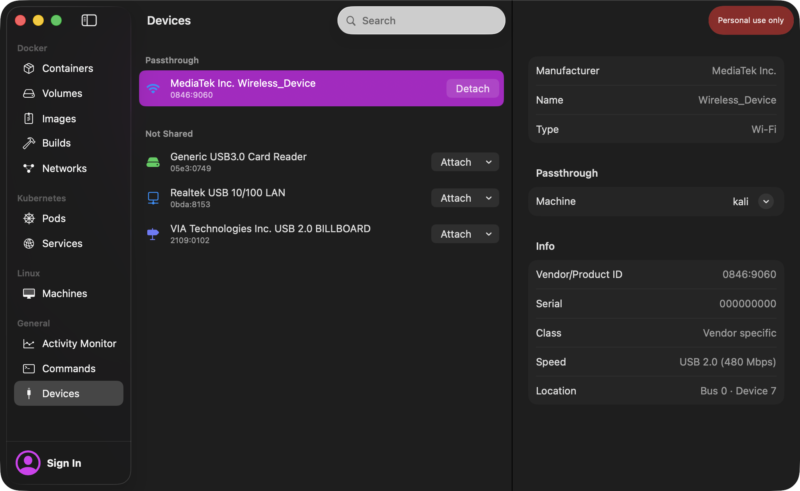
The A8000 passed through to the Kali machine.
Verify: run orb usb list again, or look at the Devices tab. The A8000 should now be listed under Passthrough.
In OrbStack’s architecture, all non-isolated machines share one Linux instance, so an attached USB device is visible to all of them. Using -m kali is what ties the network interface to the Kali machine specifically. Devices are not available in isolated machines, so do not create the Kali machine as an isolated one.
Verify the adapter
Back in the Kali shell (orb -m kali if you closed it), check that Linux sees the adapter:
Look for the ID pair 0846:9060. The name beside it reads MediaTek Inc. Wireless_Device rather than Netgear, because the A8000’s descriptor strings come from the MediaTek chipset it is built on. An unable to initialize usb spec warning may also appear; ignore it.
Next, confirm the kernel created a wireless interface. iw lives in /usr/sbin, which is not on the default user path in Kali, so run it with sudo:
A phy# entry with an Interface line under it means the driver loaded and the radio is ready. There is no need to note the name down: with one adapter attached, WiFi Explorer Pro 3 and Airtool 2 both use the first wireless interface they find.
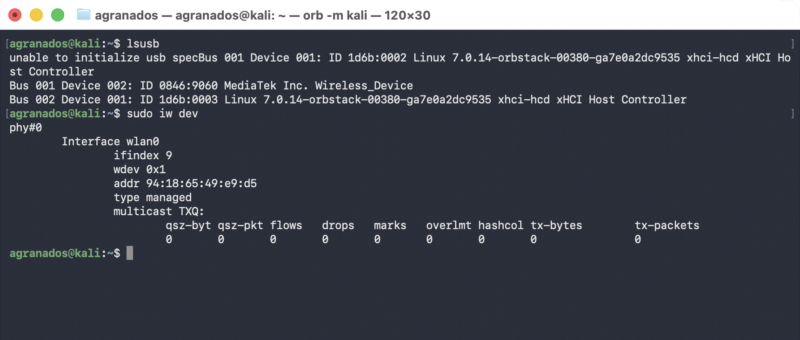
Kali sees the adapter, and the kernel created a wireless interface.
Finally, check what the radio can do:
Supported interface modes should list * monitor, which passive scanning and packet capture both require. The Frequencies lists further down show the channels the adapter supports, and the ones the current regulatory domain forbids are marked (disabled). On a fresh VM that includes all of 6 GHz, which the next section fixes.
Set the regulatory domain
Linux enforces Wi-Fi regulatory rules in the kernel. Until you tell it where it is, it applies the conservative “world” domain, which disables anything not permitted everywhere: much of 5 GHz, and on the A8000 all of 6 GHz. Set the two-letter country code for where the adapter is actually being used:
Use the code for where you really are. Picking another country to reach channels you are not permitted to use is a bad idea, and no help either, since it cannot give a radio capabilities its hardware lacks.
Verify: sudo iw reg get should report your country, and in sudo iw phy the 6 GHz frequencies, from 5955 MHz upward, should no longer be marked (disabled). The domain only unlocks what the hardware already supports, so on an adapter without a 6 GHz radio it changes nothing.
Make it persistent
The domain is set in the kernel, and OrbStack shares one kernel across all its machines. So it survives orb restart kali, but is lost whenever OrbStack itself restarts. A systemd unit in the Kali machine sets it again at boot. Create it, changing US if your country code is different:
Verify: test the unit itself, country code included, without restarting anything. Clear the domain, run the unit by hand, read the domain back, and confirm the unit will run at boot:
The domain should be your country again, and the last command should print enabled. If it comes back as country 00, the country code in the unit is wrong or the unit failed; check systemctl status regdomain.service.
Deliberately, nothing in this article asks you to restart OrbStack or the Kali machine, because both leave the adapter needing attention before Kali can see it again. These look like rough edges in OrbStack’s USB passthrough, which is a young feature, so they may well be smoothed out in a future update. The troubleshooting section covers what to do in the meantime.
Add the sensor to WiFi Explorer Pro 3
Everything from here on follows the standard sensor workflow described in Connect to a sensor. The Kali VM is, from WiFi Explorer Pro 3’s point of view, just another Linux sensor.
Enter the connection details
- Open WiFi Explorer Pro 3 > Settings > Sensors and click the + button.
- Enter the hostname of the sensor:
kali.orb.local. (You can also use the VM’s IP address, shown bysudo ip addrinside the VM oneth0, but the hostname is stable across restarts.) - Double-click the Name field to give it a recognizable name, for example “Kali (A8000)”.
- Leave Interface Name empty. WiFi Explorer Pro 3 then uses the first remote wireless interface it finds, which is the one you want with a single adapter attached. Fill it in only when several adapters are attached and you need a specific one.
- Leave Port at 22 unless you changed the SSH port in Kali.
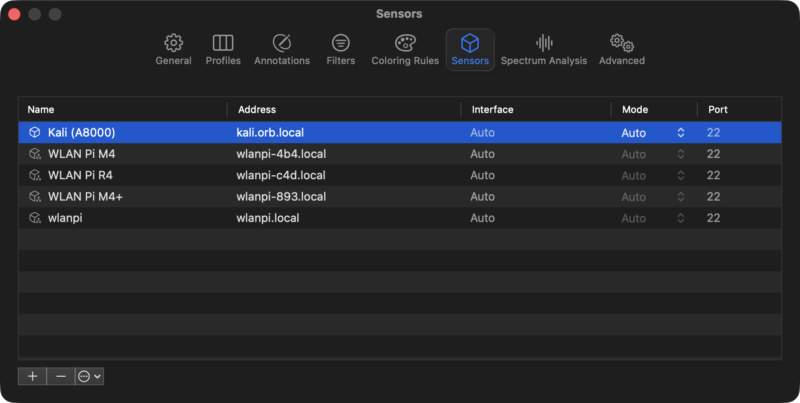
The Kali VM added as a sensor.
Connect and scan
Now connect: click the Scan Mode menu in the toolbar and select the sensor. The first time, WiFi Explorer Pro 3 prompts for a username and password. Use your VM username (the same as your macOS username) and the password you set with passwd. You can have the credentials remembered; they are stored in your Mac’s keychain. If you ever need to enter different credentials, hold the Option key while selecting the sensor.
Verify: scan results start arriving and the sensor is shown as the active scan source. If the connection fails, jump to the diagnostics below before changing anything else.
Run sensor diagnostics
WiFi Explorer Pro 3 includes a diagnostics tool for Linux sensors. Go to Settings > Sensors, select the Kali sensor, click the More button, and choose Run Diagnostics.
Diagnostics work through the requirements the sensor setup depends on: the SSH connection and your credentials, the ability to run commands with sudo without a password prompt, and the presence of the required utilities on the sensor. If something in the previous sections was skipped, this is where it shows up with a specific message rather than a generic connection failure.
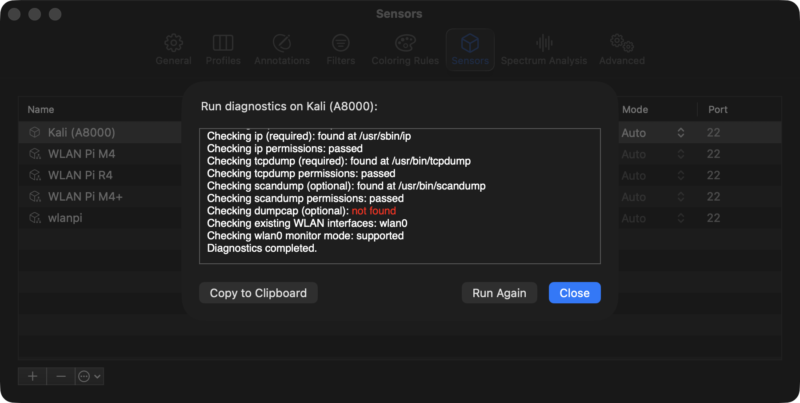
Sensor diagnostics passing.
Verify: diagnostics complete without reporting problems. If they do report one, the message tells you which requirement failed. The troubleshooting section at the end maps the common ones to fixes.
Active and passive scanning
A Linux sensor can scan in two ways, and the difference matters for what you get back.
Active scanning
Active scan mode uses scandump, and a sensor supports it only if scandump is installed. The sensor asks the kernel to perform a scan through the 802.11 netlink API, which transmits probe requests on each channel and collects the beacon and probe response frames that come back. The results are written as PCAP and streamed to WiFi Explorer Pro 3. Active scanning does not require monitor mode, so it works with adapters whose drivers lack it. As with any active scan, it depends on the kernel’s scan behavior. On channels flagged “no initiate radiation” in the regulatory database, which includes 6 GHz in some countries, the kernel scans those channels passively as part of the sweep, so detection there relies on catching beacons. The A8000 is the adapter we tested as a sensor in this setup; 6 GHz results depend on the regulatory domain being set first.
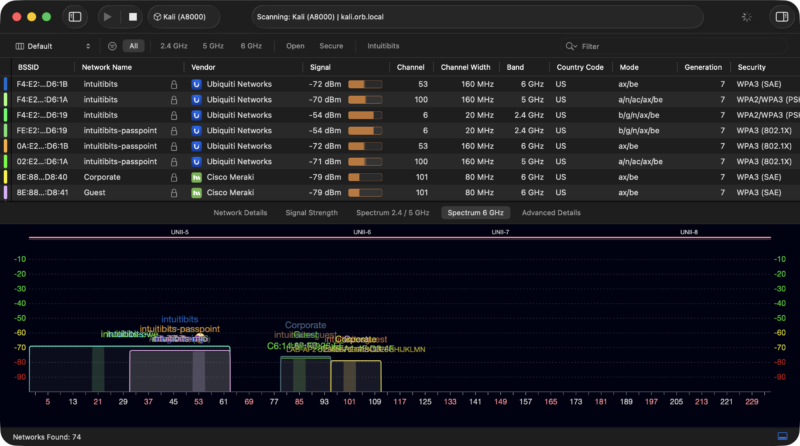
WiFi Explorer Pro 3 scanning through the external adapter.
Passive scanning
Passive scan mode puts the interface into monitor mode and uses tcpdump to listen for beacons while hopping across the supported channels. This requires an adapter and driver that support monitor mode and channel switching, which the A8000 and mt7921u do. Passive scanning tends to see networks that are farther away and produces more consistent results between scans.
Choosing the mode
By default a sensor is configured to use Auto: active scan mode is preferred when scandump is available on the sensor, otherwise passive. To choose a mode explicitly, go to WiFi Explorer Pro 3 > Settings > Sensors and change the value in the Mode column for the Kali sensor. To use passive scanning with the A8000, set it to passive there. Not every USB adapter supports passive scanning reliably even if its driver advertises monitor mode, so verify it with your own hardware. The A8000 and its driver support monitor mode and channel switching, which are the two things passive scanning needs.
Verify: run a scan in each mode. In active mode you should see nearby networks across all bands the adapter supports. In passive mode you should see a similar list, often with a few more distant networks and with signal readings that stay more consistent from one sweep to the next.
Using the sensor with Airtool 2
The same VM and adapter work as a remote capture source for Airtool 2. The workflow is described in Capture using a sensor and differs from WiFi Explorer Pro 3 in the details, so here it is end to end.
The division of labor is the same as with WiFi Explorer Pro 3. The A8000 belongs to the Kali VM. Kali’s mt7921u driver provides monitor mode and channel control. When you start a capture, Airtool 2 connects to Kali over SSH, runs commands that put the interface into monitor mode, sets the requested channel and channel width, and starts a capture whose frames are sent back to your Mac over the SSH connection. Airtool 2 never touches the USB device itself.
Add the sensor to Airtool 2
Add the sensor once:
- Click the Airtool 2 menu bar extra, choose Settings, then Sensors, and click the + button.
- Enter
kali.orb.localas the hostname. Leave Port at 22. - Optionally mark the sensor as a favorite so it appears directly in the main Airtool 2 menu.
Start a remote capture
To capture, choose the sensor from the Airtool 2 menu. Before the capture starts, Airtool 2 asks for the remote wireless interface, the channel, and the channel width. Leave the interface blank and Airtool 2 uses the first wireless interface, which is the one you want with a single adapter attached. The first time, it prompts for the SSH username and password, which it can store in your keychain.
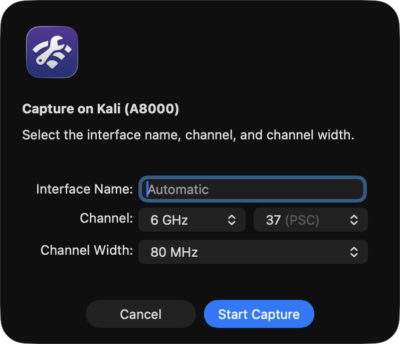
Airtool 2 asks for the remote interface, channel, and channel width.
If the selected channel and width combination is not supported by the remote interface, the capture fails and you can change the options and try again. With the A8000, this is most often a regulatory issue: a channel that shows as (disabled) in sudo iw phy cannot be used. It can also be a width the driver does not support on that channel.
All of Airtool 2’s features work with a sensor: automatic frame slicing, capture size limits, file rotation, and live captures in Wireshark. When you stop the capture, Airtool 2 saves a pcapng file and opens it in your default capture file handler, and the capture metadata comment (visible in Wireshark under Statistics > Capture File Properties) records the sensor, interface, and channel used.
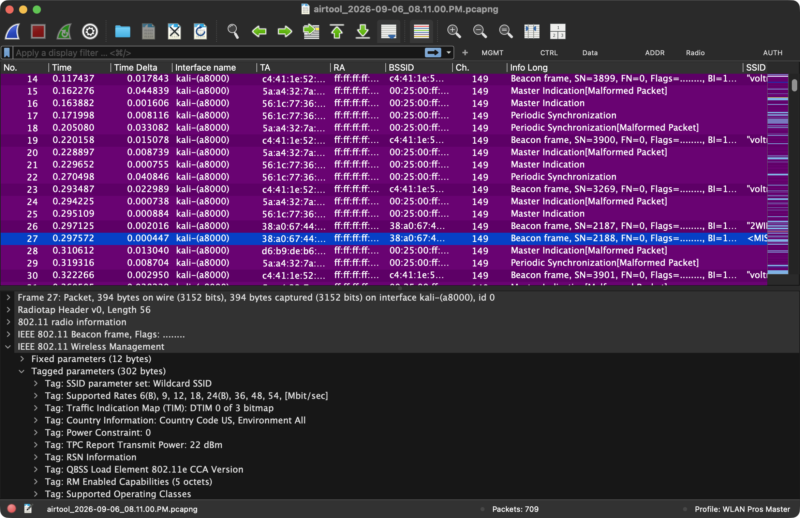
Airtool 2 Wi-Fi capture from the Kali (A8000) sensor, open in Wireshark.
Verify: start a capture on a channel you know is in use, for example the channel of your own access point, let it run for ten or twenty seconds, and stop it. The file should open with beacons, probe responses, and data frames from that channel.
Using multiple adapters with Airtool 2
This is something a Mac’s built-in adapter cannot do at all. A Wi-Fi radio can only be tuned to one channel at a time. Capturing several channels with a single adapter means hopping: while the adapter dwells on one channel, everything happening on the others is missed. Airtool 2 supports multi-channel hopping captures, but for problems that involve several radios at once, a client roaming between two APs on different channels, a band-steering decision, or a dual-band AP misbehaving on one band, you want to see every channel continuously.
With several USB adapters attached to the Kali VM, each one can sit on its own channel, and Airtool 2 can capture from all of them simultaneously into a single file.
Use identical adapters
Use the same adapter model for all of them. Different adapters behave differently: sensitivity, supported channels and widths, driver quirks, and timing all vary between chipsets, and those differences show up in the merged capture as inconsistencies that have nothing to do with the network you are looking at. With identical adapters, every source behaves the same way, and the results are directly comparable. It also removes the need to know which physical adapter is which, since any of them can take any channel. Three A8000s is the configuration we recommend for this setup.
Attach them to the VM
Connect the adapters through a USB hub. Several Wi-Fi radios draw real power, so a powered hub is the safer choice. Attach each device to the Kali machine in turn:
Each attached adapter gets its own wireless interface in Kali, and this is where the names finally matter, since Airtool 2 needs to know which interface goes on which channel. Do not assume they will be wlan0, wlan1, wlan2; read them:
You should see one phy# block per adapter, each with an Interface name and an addr (MAC address). With identical adapters, pick any interface for any channel. Matching an interface to a specific physical adapter only matters in the uncommon case where placement or antenna orientation is part of the experiment; the troubleshooting section covers how to do it.
Verify: sudo iw dev lists as many interfaces as adapters attached, each with a distinct MAC address, and lsusb -t shows a driver bound to each one.
Multi-channel captures
Multi-source captures are described in Capture on multiple channels and sensors. Airtool 2 treats each interface on a sensor as an independent capture source, so one Kali VM with three adapters gives you three sources.
- Choose Multi-Source Capture from the Airtool 2 menu.
- Click the + button once for each adapter to add an entry.
- For each entry, select the Kali sensor, enter the interface name, and choose the channel and channel width for that adapter.
- Click Start Capture.
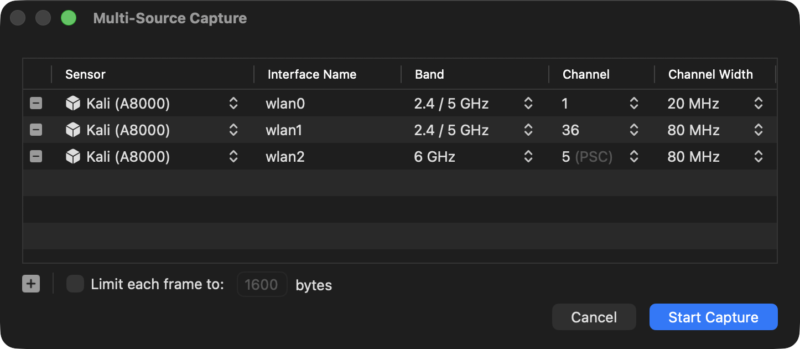
Three capture sources on one sensor, one per band.
As an example, with three A8000s you could configure:
- Interface for adapter #1: 2.4 GHz, channel 1
- Interface for adapter #2: 5 GHz, channel 36
- Interface for adapter #3: 6 GHz, channel 5
These are just illustrations. Which channels are actually available depends on the adapters, their drivers, the regulatory domain you set, and the bands each adapter supports. Airtool 2 refuses to start if the configuration is invalid, for example if the same sensor and interface name combination appears twice. Once started, the capture is all or nothing: if any one adapter fails to start capturing on its channel, the whole multi-source capture fails, so confirm each channel with a single-source capture first. To reduce the data flowing back over SSH, you can enable Limit each frame to and enter a frame size in bytes.
Verify: run a short multi-source capture with two or three adapters on channels you know are active. In the resulting file, Statistics > Capture File Properties should list each interface and channel, and filtering by interface should show traffic on each of the configured channels.
Troubleshooting
The entries below are grouped by where things break, in roughly the order the setup builds up: getting the adapter into the VM, getting the radio working, connecting the apps, sorting out channels and the regulatory domain, and running captures across several adapters. Work down from the group that matches the last step that succeeded.
USB passthrough and device detection
The adapter does not appear in orb usb list or the Devices tab. Confirm it shows up in macOS’s System Information under USB at all; if not, it is a cable, port, or hub problem. Make sure you are on OrbStack 2.2 or later, since USB passthrough does not exist in older versions. If it appears in System Information but not in OrbStack, update OrbStack and check the OrbStack issue tracker.
The adapter is attached but Kali does not see it. Run orb usb list and confirm the device is listed as attached. Confirm you attached it with -m kali and not to another machine, and that the Kali machine is not an isolated machine (devices are not available in isolated machines). Detach and reattach the device. Then run lsusb in Kali again.
You unplugged the adapter and plugged it back in. Kali stops seeing it while it is unplugged, which is expected, but after plugging it back in OrbStack still lists it as attached while Kali cannot see it. Attach it again, with orb usb attach <id> -m kali or the Attach button, and Kali picks it up. The attachment OrbStack was showing is stale.
The adapter is gone after restarting the machine. orb restart kali ends the passthrough from Kali’s side while OrbStack goes on listing the device as attached, and unlike a replug this one cannot be undone with orb usb attach. Quit OrbStack completely and open it again; the device comes back detached, so attach it once more with orb usb attach <id> -m kali. Worth knowing before you restart a machine with an adapter attached, since restarting one is a natural first thing to try when something else is wrong.
The adapter was working and then disappeared from Kali. lsusb and sudo iw dev stop showing it while OrbStack still lists it as attached, and detaching and reattaching does not bring it back. Quit OrbStack completely and start it again, then attach the adapter once more if orb usb list no longer shows it as attached. We have run into this occasionally, and a full OrbStack restart was the only thing that cleared it.
lsusb sees the adapter but there is no wireless interface. lsusb -t shows whether a driver claimed the device; an empty driver field means the kernel has no driver for that USB ID, or firmware failed to load. Check the kernel log with sudo dmesg | grep -i -E 'mt7921|firmware|usb'. For the A8000 this should not happen with a current OrbStack, since its IDs are in the mainline driver. For other adapters, check the driver and kernel requirements for its chipset; the community-maintained USB-WiFi list is a good starting point. Remember that the kernel is OrbStack’s, so keeping OrbStack updated is how you get a newer driver.
Scanning, monitor mode, and channels
The interface exists but scanning fails. Bring the interface up (sudo ip link set <iface> up) and try sudo iw dev <iface> scan. If that errors, check sudo iw reg get and set the regulatory domain. Also check sudo dmesg for driver or firmware errors logged when the adapter was attached.
Monitor mode is unavailable. Look at Supported interface modes in sudo iw phy. If monitor is missing, the driver does not support it and passive scanning and Airtool 2 captures will not work with that adapter. Active scanning in WiFi Explorer Pro 3 still can, since scandump does not need monitor mode.
Channel switching fails. The channel is most likely disabled by the regulatory domain; check for (disabled) next to it in sudo iw phy. The channel width may also be unsupported on that channel; try 20 MHz first. In Airtool 2, a failed capture lets you change the channel and width and retry.
Connecting to the sensor
WiFi Explorer Pro 3 or Airtool 2 cannot connect to Kali. Work through the SSH path from a macOS Terminal: ping kali.orb.local should answer, and ssh $US**@******rb.local should prompt for a password and log you in. If ssh is refused, the SSH server in Kali is not running: sudo systemctl enable --now ssh. If it asks for a password and rejects it, the password was not set or was mistyped: sudo passwd $USER. Do not test with ssh orb; that reaches OrbStack’s own key-based server, not the one the apps use. Also confirm the machine is running with orb list.
Sensor diagnostics fail. Read the message. Then, inside Kali, run sudo sh -c 'command -v ip iw tcpdump scandump' to confirm every utility is present, using sudo so that /usr/sbin is searched, and sudo -n iw dev to confirm sudo runs without prompting. If sudo -n asks for a password, the OrbStack sudoers file has been modified or removed; a fresh machine has it in /etc/sudoers.d/orbstack.
A utility is missing, or scandump is missing. Reinstall it. For iw and tcpdump, use sudo apt install iw tcpdump. For scandump, rebuild and reinstall from the cloned repository with make && sudo make install, then confirm with command -v scandump.
Regulatory domain and 6 GHz
Expected channels are disabled, or 6 GHz networks do not appear. Run sudo iw reg get. If it shows country 00, the domain is unset; set it as described above. If the domain is right but 6 GHz still shows (disabled) in sudo iw phy, check sudo dmesg | grep -i regulatory for a failure to load regulatory.db, and confirm the adapter has a 6 GHz radio at all. Remember too that 6 GHz has less range than 5 GHz, so the networks have to be nearby.
The regulatory domain does not survive a restart. Check you are testing the right restart: the domain sits in OrbStack’s shared kernel, so it survives orb restart kali whether or not the unit works. Only an OrbStack restart clears it, so test the unit itself instead, as in Make it persistent. Then check the country code, with grep ExecStart /etc/systemd/system/regdomain.service. A wrong code is the hardest fault to spot, since iw exits successfully on one it does not recognise and systemd reports the unit as having run fine. If the code is right, check systemctl status regdomain.service and journalctl -u regdomain.service.
Multiple adapters and captures
Adapters connected through a hub behave unreliably. Multiple radios on a bus-powered hub often exceed what the hub can supply, leading to resets and disconnects. Use a powered hub, and check sudo dmesg for USB disconnect or reset messages. Attach adapters one at a time rather than all at once, and avoid plugging or unplugging while a capture is running.
It is hard to tell which interface is which adapter. Usually you do not need to. With identical adapters, which we recommend, any interface can be assigned to any channel and the results are the same. If placement or antenna orientation does matter for what you are measuring, attach the adapters one at a time and note the new interface that appears after each, or match the addr shown by sudo iw dev against the MAC address printed on the adapter, if it has one. lsusb -t shows each adapter’s position on the USB bus, and orb usb info <id> on the macOS side shows its serial number.
Airtool 2 cannot start a remote capture. If you entered an interface name, check it for typos, since it must match sudo iw dev exactly; leaving it blank lets Airtool 2 pick the first interface. Then try a channel and width you know the adapter supports, such as 20 MHz on channel 1 or 36. Make sure the interface is not simultaneously in use by a WiFi Explorer Pro 3 passive scan or another capture; one process at a time should own an interface. Run the sensor diagnostics from Settings > Sensors > More.
Multi-source capture does not start. Each entry needs a unique sensor and interface combination. Beyond that, a multi-source capture is all or nothing: if any one adapter fails to start capturing on its configured channel and width, the whole capture fails rather than continuing with the remaining adapters. So when a multi-source capture fails, find the source that is at fault. Test each interface with a single-source capture on the channel and width you intend to use, fix whichever one fails (usually a channel disabled by the regulatory domain or an unsupported width), then combine them again.
Limitations
This is a manual setup compared to EASE: no pseudo-local sensor entry, a few packages to install by hand, and an adapter that has to be attached to the VM after each plug-in, and again after restarting the machine or OrbStack. Unlike EASE, though, it runs on current hardware and software.
The attaching should get easier. USB passthrough is new in OrbStack 2.2, and its rough edges are what make restarts cost you the adapter, so a future update could remove most of that.
The regulatory domain is global to OrbStack’s shared kernel, so it applies to every machine, not just Kali. Other machines rarely have wireless interfaces, so this seldom matters.
Adapter compatibility is not something we can promise beyond the A8000 we tested. Monitor mode support and stability vary between chipsets and driver versions, and the MediaTek mt76 driver family has had reported monitor mode regressions in some kernel versions. If you use a different adapter, verify each step rather than assuming.
Finally, 6 GHz behavior depends on more than the regulatory domain: hardware, chipset, driver, firmware, and kernel all have to support it. The A8000 does. Other adapters may not, and no configuration can add a radio that is not there.
Conclusion
The combination of OrbStack and Kali gives Apple silicon Mac users what EASE used to give Intel Mac users: a Linux environment that can drive external USB Wi-Fi adapters, reachable by WiFi Explorer Pro 3 and Airtool 2 through their normal remote sensor functionality. With a compatible adapter such as the Netgear A8000, that means passive scanning without disconnecting your Mac from its network, 6 GHz visibility on Macs whose built-in adapter lacks it, and monitor-mode packet capture from an adapter you choose. Add a hub and a few more adapters, and Airtool 2 can capture several channels at the same time into one file, which is what you need when the problem involves more than one radio.
Some links in this article are Amazon affiliate links. As an Amazon Associate we earn from qualifying purchases.
About the Author: Adrian Granados