
You can capture packet traces from your iPhone, iPad, or iPod touch using Airtool 2. A packet trace capture from an iOS device records traffic at the network layer (Layer 3) passing through all interfaces, including Wi-Fi, AWDL, and cellular.
Packet traces are useful for investigating complex network problems related to connectivity and performance. For example, you can use packet captures to validate the network’s quality of service configuration or analyze under which circumstances Wi-Fi or cellular handoff occurs.
iPhone packet trace.
To capture traffic from your iOS device, Airtool 2 uses a tool called Remote Virtual Interface (RVI). RVI is a mechanism that allows you to create a virtual network interface on your Mac and use tools like tcpdump to capture packets from the iOS device attached to that virtual interface.
The process outlined by Apple to use RVI is very much manual. You connect your device to your Mac, find out the UUID of the device, use the UUID and a command-line interface tool to create the RVI for the device, and then do the capture using tcpdump by passing the name of the RVI interface and the desired tcpdump options. Airtool 2 automates this process and makes capturing traffic from your iPhone, iPad, or iPod touch a 1-click operation.
Get started
If you haven’t already, install Xcode from the Mac App Store. When you first launch Xcode and install the additional required components, it installs the rvictl tool.
You may verify that rvictl is correctly installed by opening Terminal and typing:
If you get the message command not found: rvictl, then rvictl is not installed or cannot be found. To troubleshoot RVI, see Troubleshooting the Remote Virtual Interface (RVI) in Troubleshooting Packet Traces.
On a Mac with Apple silicon, you must also enable System Extensions. To learn more about enabling system extensions, see About system extensions and macOS.

System extensions need to be enabled on a Mac with Apple silicon.
Note: If you’re still unable to capture a packet trace after enabling system extensions, go to System Preferences > Security & Privacy > General and click “Allow” to finish the installation of Apple’s system extension required to use the RVI tool.
Capture iOS packet traces
After installing the RVI tool, capturing from your iPhone, iPad, or iPod touch using Airtool 2 is straightforward:
- Connect your device to your Mac via USB.
- Choose the capture packet trace option for the connected iOS device from the Airtool 2 menu.

Capture iPhone packet trace option.
When you choose to capture from your iPhone, iPad, or iPod touch, Airtool 2 automatically creates the remote virtual interface for the device and starts the capture. When the capture ends, Airtool 2 removes the remote virtual interface.
About iOS packet traces
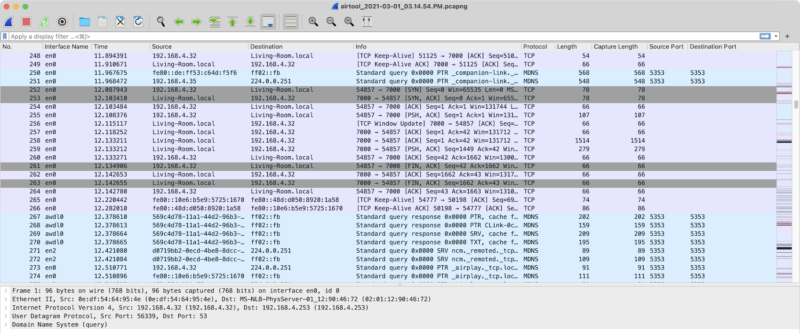
Because RVI represents the entire network stack of the iOS device, you cannot target a specific interface (e.g., Wi-Fi or cellular) on your iOS device as you would do on the Mac, so Airtool 2 saves information about the interface in the packet metadata. Then, in Wireshark, for example, you can choose to display the interface name for each packet.
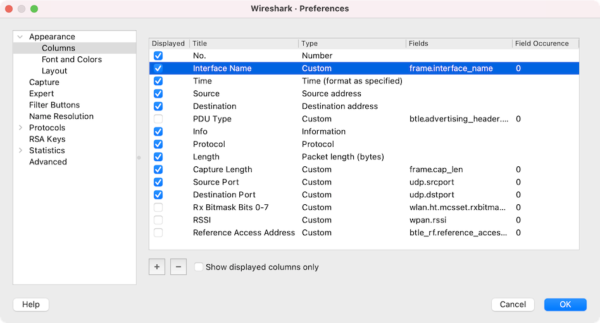
You can add a column to display the interface name in Wireshark.
You can also filter the trace based on that interface. For example, if you only want to display traffic from the AWDL interface, use the filter expression frame.interface_name == "awdl0"

Troubleshooting
Making sure RVI is installed and functional can be challenging, especially on a Mac with Apple silicon, but once RVI’s working, capturing from your iPhone, iPad, or iPod touch should work without any issues. However, here we describe two problems that may prevent you from capturing from your device successfully and how to resolve them:
I’ve connected my device, but I can’t see it listed in the Airtool 2 menu.
Your iPhone, iPad, or iPod touch will be available to capture packet traces in Airtool 2 only if you choose to accept the device to trust the Mac when you connect it to the computer for the first time. To learn more about the “Trust This Computer” alert, see About the “Trust This Computer” alert on your iPhone, iPad, or iPod touch. Similarly, you may need to unlock your iPhone, iPad, or iPod touch so that Airtool 2 can see your device and capture traffic from it.
The capture fails with “Unable to create or open capture interface.”
On a Mac with Apple silicon, the first time you try to capture traffic from your device after enabling System Extensions, the capture may fail because macOS needs your permission to load or update the system extension that the RVI tool requires to function. Go to System Preferences > Security & Privacy > General and click “Allow” to allow the system extension. After restarting, Airtool 2 should be able to use RVI to capture traffic from the device.

You need to authorize the system extension after the first time Airtool 2 tries to use RVI.
If you’re still unable to capture from your device, please contact us.
Conclusion
Packet traces are useful to investigate complex network problems. Airtool 2 uses Apple’s Remote Virtual Interface tool to capture packet traces from your iPhone, iPad, or iPod touch with a single click. Additionally, as with other types of captures, Airtool 2 advanced features such as capture limits, file rotation, and live captures are available when recording packet traces from your device.
How does the iPhone talk to the Internet so that you cannot just use tcpdump/wireshark directly and filter its IP or MAC address?
Hi Buzz, I’m sorry but I don’t understand the question. Can you elaborate more?
Adrian, my question is why you need to connect your iPhone to your Mac? With my Linux boxes I can just filter traffic by they IP address, but I could not find the same for an iPhone.
For example iPhone has 10.0.0.155, but no TCP traffic shows up when I filter “ip.add == 10.0.0.155” in Wireshark. I curl-ed test.com (which only have an IPv4 address, no IPv6) over http from a Terminal app. Doing the same thing from my Linux laptop works as expected: Wireshark shows the request/response in cleartext.
When you capture traffic over the air it’s usually encrypted at the Layer 2 level, but when you do the capture on the iPhone itself (by using the method describe in this blog), you can capture the Layer 3 traffic unencrypted and can then use filters, etc. That’s the reason whey you need to connect the iPhone to your Mac.